How To Make Cold Brew Coffee At Home Using Glass Sippers And Tumblers
If you have ever sipped a perfectly chilled, smooth, and slightly sweet cup of Cold Brew Coffee from a café and thought — “I wish I could make this at home” — you are in the right place. The good news is that making Cold Brew Coffee at home is not only simple but also surprisingly affordable, especially when you use the right tools like glass sippers and tumblers. These elegant vessels are not just for serving; they actually play a role in the brewing and storing process too.
In this guide, we will walk you through everything you need to know — from choosing the right coffee beans to the final pour — so you can enjoy barista-quality Cold Brew Coffee from the comfort of your own kitchen.
What Is Cold Brew Coffee And Why Is It So Popular?
Before we dive into the how-to, let us understand what makes Cold Brew Coffee different from your regular iced coffee. Unlike traditional iced coffee, which is simply hot-brewed coffee poured over ice, Cold Brew Coffee is made by steeping coarsely ground coffee in cold or room-temperature water for an extended period — usually 12 to 24 hours. This slow extraction process produces a concentrate that is naturally smoother, less acidic, and slightly sweeter than hot-brewed coffee.
The result? A drink that is gentle on the stomach, rich in flavor, and incredibly refreshing on a hot day. It is no wonder that Cold Brew Coffee has become one of the most popular coffee trends in recent years, both in cafés and home kitchens around the world.
Why Use Glass Sippers And Tumblers For Cold Brew Coffee?
You might wonder why glass sippers and tumblers are specifically recommended for Cold Brew Coffee. Here are a few solid reasons:
- Taste Purity: Glass is non-porous and does not absorb flavors or odors. This means your Cold Brew Coffee will taste exactly as it should — clean, rich, and unadulterated — without any plastic or metallic aftertaste.
- Visual Appeal: There is something deeply satisfying about watching the rich, dark coffee slowly settle through a glass tumbler. The transparency of glass lets you see the beautiful layers and colors of your brew.
- Temperature Retention: Many glass tumblers come with double-wall insulation, which keeps your Cold Brew Coffee cold for hours without the need for constant refilling of ice.
- Eco-Friendly Choice: Glass is reusable, easy to clean, and far more sustainable than single-use plastic cups.
- Versatility: Glass sippers and tumblers can double as your brewing vessel if they have a wide enough mouth and a lid, making them a two-in-one solution for brewing and serving.
What You Will Need
Before you begin, gather the following:
- Coffee: Use coarsely ground coffee beans. Medium to dark roast varieties work best for Cold Brew Coffee as they bring out rich, chocolatey, and nutty flavors. Avoid finely ground coffee, as it makes the filtration process difficult and can result in a muddy, bitter brew.
- Water: Use filtered or cold water for the best results. The quality of water directly impacts the taste of your final brew.
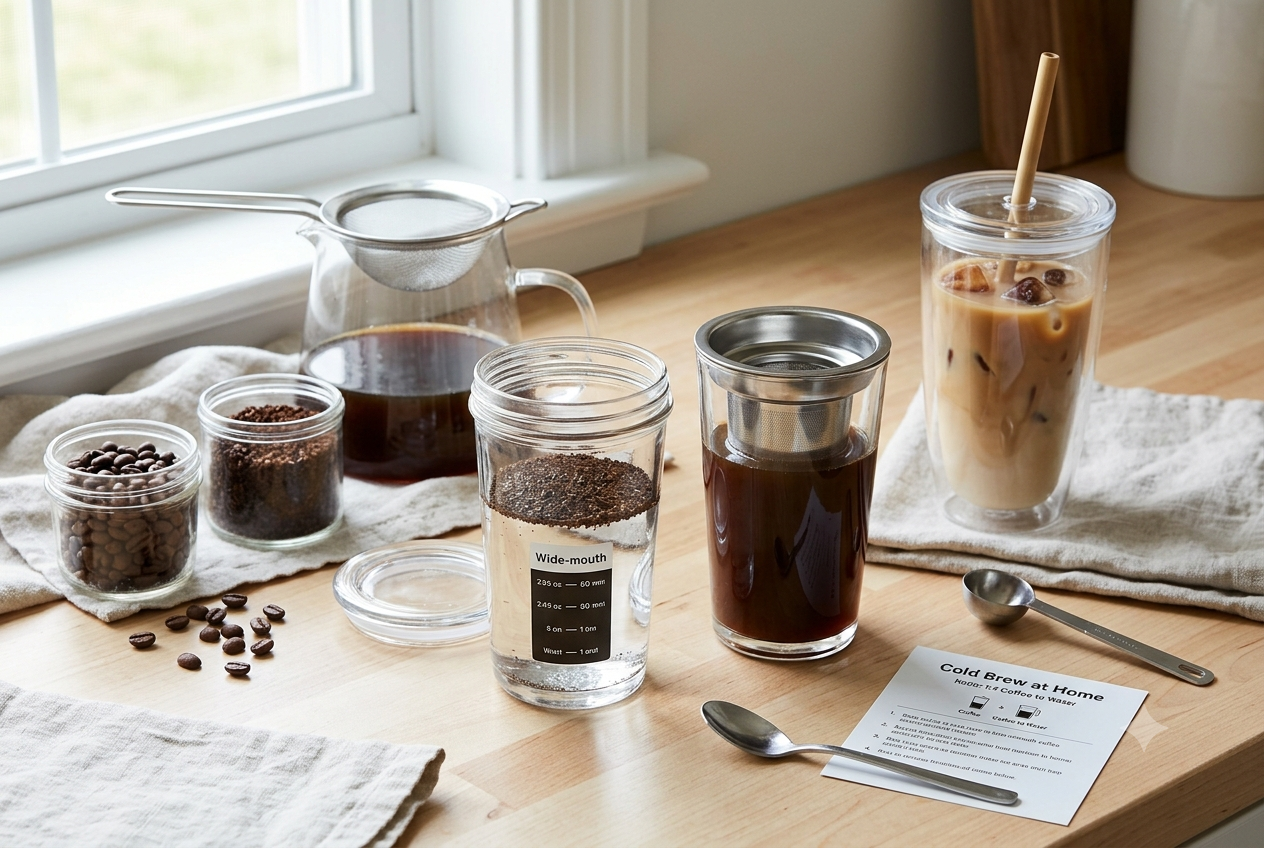
- Glass Sipper or Wide-Mouth Glass Tumbler: A large glass jar or a wide-mouth glass tumbler with a lid works perfectly. Ideally, choose one that holds at least 500ml to 1 litre of liquid.
- Fine Mesh Strainer or Cheesecloth: For filtering out the coffee grounds after brewing.
- A Ratio Guide: The standard ratio for Cold Brew Coffee concentrate is 1 part coffee to 4 parts water. For a less concentrated brew, you can go 1:8.
Step-By-Step Guide To Making Cold Brew Coffee At Home
Step 1: Measure Your Coffee and Water
Start by measuring your coffee and water according to your preferred ratio. For a strong concentrate using a 500ml glass tumbler, use approximately 60–70 grams of coarsely ground coffee and 250ml of cold filtered water. If you prefer a milder brew, increase the water to 500ml.
Step 2: Combine Coffee and Water in Your Glass Vessel
Add the coarsely ground coffee directly into your glass sipper or tumbler. Slowly pour cold water over the grounds, making sure all the coffee is fully saturated. Give it a gentle stir to ensure even soaking. Place the lid on your glass tumbler securely.
Step 3: Let It Steep
This is where patience becomes your best ingredient. Place your glass tumbler in the refrigerator and let the coffee steep for 12 to 24 hours. Most people find that 16 to 18 hours produces the ideal balance of flavor and smoothness for Cold Brew Coffee. The longer you steep, the stronger and more concentrated the brew will be.
If you prefer a slightly warmer extraction, you can leave it at room temperature for 8 to 12 hours. However, refrigerator brewing is recommended as it reduces the risk of bacterial growth and produces a cleaner, crisper flavor profile.
Step 4: Strain The Brew
Once your steeping time is up, it is time to filter out the coffee grounds. Place a fine mesh strainer lined with cheesecloth over a clean bowl or another glass container. Slowly pour the steeped liquid through the strainer. Allow gravity to do the work — do not squeeze or press the grounds, as this can introduce bitterness into your Cold Brew Coffee.
For an extra clean finish, you can strain it twice.
Step 5: Store and Serve
Pour your filtered Cold Brew Coffee concentrate back into your glass sipper or tumbler. Seal with the lid and store in the refrigerator. It will stay fresh for up to two weeks, though it is best consumed within the first 7 to 10 days for peak flavor.
To serve, pour the concentrate over ice and dilute with cold water, milk, oat milk, or any milk alternative in a 1:1 ratio. You can also enjoy it straight if you prefer a stronger cup.
Tips To Elevate Your Cold Brew Coffee At Home
- Experiment With Coffee Origins: Different coffee origins bring unique flavor notes to your Cold Brew Coffee. Ethiopian beans often deliver fruity and floral notes, while Colombian beans tend to be balanced and nutty. Try single-origin beans to explore the spectrum of flavors.
- Try Flavored Variations: Add a cinnamon stick, a few cardamom pods, or a vanilla bean to your grounds before steeping. These subtle additions can transform your Cold Brew Coffee into something truly special without overpowering the natural coffee flavor.
- Use a Bamboo or Stainless Straw With Your Glass Sipper: A wide-mouth glass sipper with a straw is not just aesthetically pleasing — it also makes sipping your cold brew effortless. Using a reusable straw keeps things eco-friendly and adds to the café-at-home experience.
- Make a Large Batch: One of the biggest advantages of Cold Brew Coffee is its long shelf life. Make a large batch over the weekend and enjoy it throughout the week without any daily preparation hassle.
- Use Ice Cubes Made From Coffee: To avoid diluting your brew, freeze some of your Cold Brew Coffee in an ice tray. Use these coffee ice cubes to keep your drink cold without watering it down.
Common Mistakes To Avoid
- Using Fine Grind Coffee: This is one of the most common errors. Fine grounds over-extract during the long steep, resulting in a bitter, gritty Cold Brew Coffee. Always use a coarse grind.
- Skipping the Filtering Step: Rushing through filtration or using an inadequate strainer leaves sediment in your drink. Take your time with this step for a smooth, clean result.
- Using Tap Water: Tap water with chlorine or strong minerals can negatively affect the taste. Always opt for filtered water when making Cold Brew Coffee at home.
- Not Sealing the Container: Leaving your brew uncovered during steeping can expose it to refrigerator odors, affecting the final flavor. Always seal your glass tumbler or sipper with a tight-fitting lid.
Final Thoughts
Making Cold Brew Coffee at home is one of the most rewarding kitchen projects you can take on, especially when you invest in quality glass sippers and tumblers. Not only do these vessels enhance the brewing and serving experience, but they also add a touch of elegance to your daily coffee ritual.
With just a handful of ingredients, a little patience, and the right glassware, you can consistently craft a brew that rivals anything from a specialty café. So go ahead — pick up your favorite glass tumbler, some good quality coarsely ground beans, and start your Cold Brew Coffee journey today. Your perfect cup is just 16 hours away.
FAQs
1. How long should I steep Cold Brew Coffee at home?
The ideal steeping time for Cold Brew Coffee is between 12 to 24 hours. For most people, 16 to 18 hours in the refrigerator produces the best balance of smoothness and strength. If you prefer a lighter flavor, stick to 12 hours. For a bolder, more concentrated brew, go up to 24 hours. Steeping beyond 24 hours can make the brew taste overly bitter and harsh.
2. Can I use any type of coffee beans for Cold Brew Coffee?
Yes, you can use any coffee beans, but medium to dark roast beans are most commonly recommended for Cold Brew Coffee because they produce rich, chocolatey, and full-bodied flavors during the slow cold extraction. Light roast beans can also be used and will give a more fruity and floral profile. The most important factor is the grind size — always use coarsely ground coffee regardless of the roast level.
3. Can I make Cold Brew Coffee without a special brewer or equipment?
Absolutely. You do not need any fancy equipment to make Cold Brew Coffee at home. A wide-mouth glass tumbler or glass sipper, coarsely ground coffee, cold filtered water, and a fine mesh strainer or cheesecloth are all you need. Glass vessels are especially ideal because they are non-reactive, easy to clean, and do not absorb any flavors or odors that could affect your brew.
4. Can I heat up Cold Brew Coffee concentrate?
Yes, you can gently warm Cold Brew Coffee concentrate if you prefer a hot drink. Because of its low acidity and smooth flavor, many people enjoy heating it up as a less harsh alternative to regular hot coffee. Simply warm it on the stove over low heat or in the microwave for 30 to 45 seconds. Avoid boiling it, as high heat can alter the delicate flavor compounds that make Cold Brew Coffee so smooth and enjoyable.
Tags:
- Cold Brew Coffee
Related Posts
Most people know they should drink more water. The advice is everywhere — eight glasses a day, half your body...
- 6 min read
- 6 min read
- 6 min read
- 6 min read